Fork me on GitHub

启动Activity的那点事儿

前言

这次主要是从源码角度和IPC角度分析下Activity的启动流程,基于Android 8.0,估计知识点比较多0.0,而且需要提前了解下一丢丢IPC的东西。


铺垫

首先,从用户点击APP图标开始走起。既然是启动一个APP,那必然需要启动一个进程来执行App。因为Android是基于Linux的,所有的进程都是由init进程fork出来的。所以(1)当手机系统启动的时候,init进程会创建一个Zygote进程,后面我们所有app的进程都是由这个Zygote进程fork出来的;(2)当有app启动时,ActivityManagerService会通过socket通知Zygote进程fork一个新进程。在这里额外说明一哈,其实这个AMS也是通过Zygote创建的,Zygote进程创建后首先会创建一个SystemServer进程,在这个SS进程中会启动像AMS、PMS这样的服务,有的都是IPC中关键的服务端程序。所以Zygote进程和SystemServer进程是Android Framework中非常重要的两大进程。

上面说到了app的进程是由Zygote孵化出来的,那么究竟是哪个进程去通知孵化的。其实很简单,如果是从其他app中启动的,就是那个app所在的进程;如果是从桌面启动的就是launcher进程,Launcher其实也是继承自Activity,所以我们也可以把桌面当作一个app,两种启动的方式都是调用startActivity()发送intent请求。


那么……敌军还有5秒到达战场……重要的来了

Activity(C端)

我们通常调用的startActivity的几种重载方法最终都会调用startActivityForResult()方法

1
2
3
4
5
6
7
8
9
10
11
12
13
14
15
16
17
18
19
20
21
public void startActivityForResult(@RequiresPermission Intent intent, int requestCode,
@Nullable Bundle options)
{
if (mParent == null) {
options = transferSpringboardActivityOptions(options);
Instrumentation.ActivityResult ar =mInstrumentation.execStartActivity(
this, mMainThread.getApplicationThread(), mToken, this,intent, requestCode, options);
if (ar != null) {
mMainThread.sendActivityResult(
mToken, mEmbeddedID, requestCode, ar.getResultCode(),
ar.getResultData());
}
cancelInputsAndStartExitTransition(options);
} else {
if (options != null) {
mParent.startActivityFromChild(this, intent, requestCode, options);
} else {
mParent.startActivityFromChild(this, intent, requestCode);
}
}
}

主要看当mParent为null时,这个mParent指的是ActivityGroup,用来嵌套多个Activity,不过这个现在已经被废弃了,都用fragment来代替了,这里提主要是为了提醒下startActivityFromChild()这个方法,也能启动activity(记得在笔试题见到过 = =、)。好了回归主线,启动Activity的任务会交给Instrumention的execStartActivity()方法,注意这里的一个参数 mMainThread.getApplicationThread(),很重要,先记住。

1
2
3
4
5
6
7
8
9
10
11
12
13
14
15
16
17
18
19
20
21
22
23
24
25
26
27
28
29
30
31
32
33
34
//Instrumention.java
public ActivityResult execStartActivity(Context who, IBinder contextThread,
IBinder token,Activity target,Intent intent, int requestCode, Bundle options) {
IApplicationThread whoThread = (IApplicationThread) contextThread;
.......
try {
intent.migrateExtraStreamToClipData();
intent.prepareToLeaveProcess(who);
int result = ActivityManager.getService()
.startActivity(whoThread, who.getBasePackageName(), intent,
intent.resolveTypeIfNeeded(who.getContentResolver()),
token, target != null ? target.mEmbeddedID : null,
requestCode, 0, null, options);
checkStartActivityResult(result, intent);
} catch (RemoteException e) {
throw new RuntimeException("Failure from system", e);
}
return null;
}
//上面是8.0的源码,和8.0之前有差别,但是原理都是一样的,具体的区别有兴趣的可以自行查看
//ActivityManager.java
public static IActivityManager getService() {
return IActivityManagerSingleton.get();
}
private static final Singleton<IActivityManager> IActivityManagerSingleton =
new Singleton<IActivityManager>() {
@Override
protected IActivityManager create() {
final IBinder b = ServiceManager.getService(Context.ACTIVITY_SERVICE);
final IActivityManager am = IActivityManager.Stub.asInterface(b);
return am;
}
};

首先来说说Instrumention这个类,每个Activity都持有Instrumentation对象的一个引用,但是整个进程只会存在一个Instrumentation对象,Instrumentation充当着一个管家的作用,任何和activity生命周期包括创建相关的方法都是通过它来具体实现的,这些后面再说它。

在execStartActivity()中,通过ActivityManager启动activity,ActivityManager.getService()返回的是一个单例,这个单例通过 asInterface()方法返回了一个Proxy对象,Proxy对象实现了IActivityManager接口,里面保存着服务端的binder对象(这个对象是通过ServiceManager拿到服务端的AMS binder对象),所以最后会通过Binder跨进程去调用服务端AMS中的方法启动activity。这其实就是个aidl的模板,可以自己敲一个aidl的实例对照着分析。

注意: 在8.0的时候,这里直接采用了aidl进行cs通信,所以8.0以前的ActivityManagerNative(服务端)、ActivityManagerProxy(客户端)已经被废弃,没有之前那么复杂了,但是原理都是一样的,最后都会跨进程去通知服务端的AMS启动activity。只不过8.0之前是通过binder(ActivityManagerNative)的transact()方法将数据打包成Parcel对象传给服务端,具体的流程大家可以自己去查阅,现在市面上的分析大部分都是8.0之前的版本。


AMS(S端)

现在启动任务交给了核心服务AMS处理:

1
2
3
4
5
6
7
8
9
10
11
12
//ActivityManagerService.java
@Override
public final int startActivity( .......) {
return startActivityAsUser(........);
}
@Override
public final int startActivityAsUser(........);
userId = mUserController.handleIncomingUser(Binder.getCallingPid(), Binder.getCallingUid(),
userId, false, ALLOW_FULL_ONLY, "startActivity", null);
return mActivityStarter.startActivityMayWait(.......);
}

为了方便看到流程,我把详细参数都省略掉了,可以看到最后会交给ActivityStarter去启动:

1
2
3
4
5
6
7
8
9
10
11
12
13
14
15
16
17
18
19
20
21
22
23
24
25
26
27
28
29
30
31
32
33
34
35
36
37
38
39
40
41
42
43
44
45
46
47
48
49
50
51
52
53
54
//ActivityStarter.java
final int startActivityMayWait(IApplicationThread caller, int callingUid,String callingPackage, Intent intent, .....){
....
final ActivityRecord[] outRecord = new ActivityRecord[1];
int res = startActivityLocked(caller, intent, ephemeralIntent, resolvedType,
aInfo, rInfo, voiceSession, voiceInteractor,
resultTo, resultWho, requestCode, callingPid,
callingUid, callingPackage, realCallingPid, realCallingUid, startFlags,
options, ignoreTargetSecurity, componentSpecified, outRecord, inTask,
reason);
....
return res;
}
//验证intent、Class、Permission等
int startActivityLocked(IApplicationThread caller, Intent intent, Intent ephemeralIntent,....){
....
mLastStartActivityResult = startActivity(caller, intent, ephemeralIntent, resolvedType,
aInfo, rInfo, voiceSession, voiceInteractor, resultTo, resultWho, requestCode,
callingPid, callingUid, callingPackage, realCallingPid, realCallingUid, startFlags,
options, ignoreTargetSecurity, componentSpecified, mLastStartActivityRecord,
inTask);
....
return mLastStartActivityResult != START_ABORTED ? mLastStartActivityResult : START_SUCCESS;
}
private int startActivity(IApplicationThread caller, Intent intent, Intent ephemeralIntent,.....){
.....
//这里会去调用另外一个重载的startActivity()方法,具体的我就不贴了,下面是最后的出口
result = startActivityUnchecked(r, sourceRecord, voiceSession, voiceInteractor,
startFlags, doResume, options, inTask, outActivity);
return result;
}
private int startActivityUnchecked(final ActivityRecord r, ActivityRecord sourceRecord,
IVoiceInteractionSession voiceSession, IVoiceInteractor voiceInteractor,
int startFlags, boolean doResume, ActivityOptions options, TaskRecord inTask,
ActivityRecord[] outActivity) {
....
//检查栈顶活动是否是我们要启动的activity
final boolean dontStart = top != null && mStartActivity.resultTo == null
&& top.realActivity.equals(mStartActivity.realActivity)
&& top.userId == mStartActivity.userId
&& top.app != null && top.app.thread != null
&& ((mLaunchFlags & FLAG_ACTIVITY_SINGLE_TOP) != 0
|| mLaunchSingleTop || mLaunchSingleTask);
//准备工作已经完成
if (dontStart) {
topStack.mLastPausedActivity = null;
if (mDoResume) {
mSupervisor.resumeFocusedStackTopActivityLocked();
}
....
}
}

其实,ActivityStarter类中的逻辑像是在做战斗前的准备工作,比如确认战斗的双方、战斗的目标和战斗时间等等。在startActivityMayWait()方法中主要获取调用者的uid和pid,并且通过resolveIntent和resolveActivity获取ActivityInfo信息,确定要启动的Activity组件;在startActivityLocked()方法中去调用startActivity()创建ActivityRecord,记录activity的核心状态信息;在startActivityUnchecked()方法中根据intent的Flag信息、activity的启动模式分配或者创建任务栈,设置TaskRecord。最后去调用ActivityStackSupervisor和ActivityStack中的相关方法:

1
2
3
4
5
6
7
8
9
10
11
12
13
14
15
16
17
18
19
20
21
22
23
24
25
26
27
28
29
30
31
32
33
34
35
36
37
38
39
40
41
42
43
44
45
46
47
48
49
50
51
52
53
54
55
56
57
58
59
60
61
62
63
64
65
66
67
68
69
70
71
72
73
74
75
76
77
78
79
//ActivityStackSupervisor.java
boolean resumeFocusedStackTopActivityLocked(
ActivityStack targetStack, ActivityRecord target, ActivityOptions targetOptions) {
if (targetStack != null && isFocusedStack(targetStack)) {
return targetStack.resumeTopActivityUncheckedLocked(target, targetOptions);
}
final ActivityRecord r = mFocusedStack.topRunningActivityLocked();
if (r == null || r.state != RESUMED) {
mFocusedStack.resumeTopActivityUncheckedLocked(null, null);
} else if (r.state == RESUMED) {
// Kick off any lingering app transitions form the MoveTaskToFront operation.
mFocusedStack.executeAppTransition(targetOptions);
}
return false;
}
//ActivityStack.java
boolean resumeTopActivityUncheckedLocked(ActivityRecord prev, ActivityOptions options) {
if (mStackSupervisor.inResumeTopActivity) {
// Don't even start recursing.
return false;
}
boolean result = false;
try {
// Protect against recursion.
mStackSupervisor.inResumeTopActivity = true;
result = resumeTopActivityInnerLocked(prev, options);
} finally {
mStackSupervisor.inResumeTopActivity = false;
}
final ActivityRecord next = topRunningActivityLocked(true /* focusableOnly */);
if (next == null || !next.canTurnScreenOn()) {
checkReadyForSleep();
}
return result;
}
//这里主要是判断需要启动的Activity所在进程和app是否存在,不存在的话去孵化进程,存在的话直接启动activity
private boolean resumeTopActivityInnerLocked(ActivityRecord prev, ActivityOptions options) {
if (next.app != null && next.app.thread != null) {
........
}else {
.......
mStackSupervisor.startSpecificActivityLocked(next, true, true);
}
return true;
}
//ActivityStackSupervisor.java
void startSpecificActivityLocked(ActivityRecord r,boolean andResume, boolean checkConfig) {
ProcessRecord app =
mService.getProcessRecordLocked(r.processName,r.info.applicationInfo.uid, true);
r.getStack().setLaunchTime(r);
if (app != null && app.thread != null) {
try {
if ((r.info.flags&ActivityInfo.FLAG_MULTIPROCESS) == 0
|| !"android".equals(r.info.packageName)) {
app.addPackage(r.info.packageName, r.info.applicationInfo.versionCode,
mService.mProcessStats);
}
realStartActivityLocked(r, app, andResume, checkConfig);
return;
} catch (RemoteException e) {
Slog.w(TAG, "Exception when starting activity "
+ r.intent.getComponent().flattenToShortString(), e);
}
}
}
final boolean realStartActivityLocked(ActivityRecord r, ProcessRecord app,
boolean andResume, boolean checkConfig) throws RemoteException {
......
app.thread.scheduleLaunchActivity(new Intent(r.intent), r.appToken,
System.identityHashCode(r), r.info,
mergedConfiguration.getGlobalConfiguration(),
mergedConfiguration.getOverrideConfiguration(), r.compat,
r.launchedFromPackage, task.voiceInteractor, app.repProcState, r.icicle,
r.persistentState, results, newIntents, !andResume,
mService.isNextTransitionForward(), profilerInfo);
}

可以看到上面的代码是绕来绕去,= =、我们知道activity都是通过任务栈来进行管理的,所以stackSupervisor就是服务端统一管理这些任务栈的地方,而ActivityStack就是用来管理当前任务栈中的activity,所以服务端干的事简单来说就是完成activity的切换、将要启动的activity移至栈顶,然后通知客户端去渲染ui。但是实际上里面的逻辑很复杂,比如说不同启动模式下,栈中的activity如何操作,以及我们常见的为什么是firstActivity onPause之后secondActivity 才开始创建等等,这些和任务栈相关的都是在服务端控制。
里面具体的逻辑这里就不分析了,我们主要分析这个启动流程,参考下图了解下即可。
此处输入图片的描述
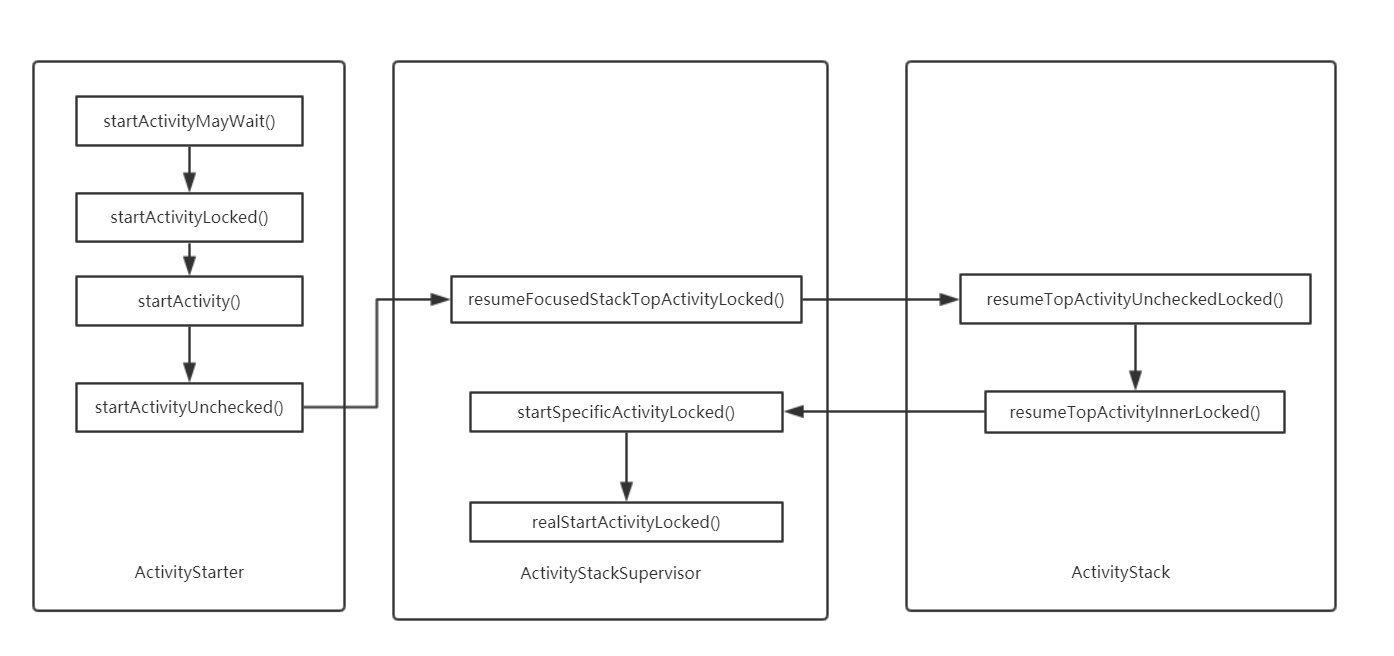
重点是最后这个realstart方法中的这句scheduleLaunchActivity,其他之前的包括starter中的逻辑都是在铺垫。。这个app.thread其实是保存在ProcessRecord中的一个IApplicationThread对象,是不是感觉这个对象名字很熟悉,它其实就是客户端中的ApplicationThread,因为从AMS开始,方法的执行都是在服务端执行,所以服务端的工作做完了,就需要去通知客户端去操作了,那么通知的桥梁就是这个ApplicationThread对象,它继承自IApplicationThread.Stub,是一个binder对象,其实这里跟上面和AMS的通信一样,在8.0之后,统一采用aidl方式,放弃了像ApplicationThreadNative+ApplicationThreadProxy的方式,但是它们的作用和aidl生成的java类中的逻辑是一样的,这个大家手动敲一个aidl的例子对比一哈就能看出来。

回到主线程

下面我们就具体看看客户端后续在干什么:

1
2
3
4
5
6
7
8
9
10
11
12
13
14
15
16
17
18
19
20
21
22
23
24
25
26
27
28
29
30
31
32
33
34
35
36
37
38
39
40
41
42
43
44
45
46
47
48
49
50
51
52
53
54
55
56
57
58
59
60
61
62
63
64
65
66
67
68
69
70
71
72
73
74
75
76
77
78
79
80
81
82
83
84
85
86
87
88
89
90
91
92
93
94
95
96
97
98
99
100
101
102
103
104
105
106
107
108
109
110
111
112
113
114
115
116
117
118
//ActivityThread.ApplicationThread.java
@Override
public final void scheduleLaunchActivity(Intent intent, IBinder token, int ident,
ActivityInfo info, Configuration curConfig, Configuration overrideConfig,
CompatibilityInfo compatInfo, String referrer, IVoiceInteractor voiceInteractor,
int procState, Bundle state, PersistableBundle persistentState,
List<ResultInfo> pendingResults, List<ReferrerIntent> pendingNewIntents,
boolean notResumed, boolean isForward, ProfilerInfo profilerInfo) {
updateProcessState(procState, false);
//创建ActivityClientRecord
ActivityClientRecord r = new ActivityClientRecord();
r.token = token;
r.ident = ident;
r.intent = intent;
r.referrer = referrer;
r.voiceInteractor = voiceInteractor;
r.activityInfo = info;
r.compatInfo = compatInfo;
r.state = state;
r.persistentState = persistentState;
r.pendingResults = pendingResults;
r.pendingIntents = pendingNewIntents;
r.startsNotResumed = notResumed;
r.isForward = isForward;
r.profilerInfo = profilerInfo;
r.overrideConfig = overrideConfig;
updatePendingConfiguration(curConfig);
//将消息传给handler处理
sendMessage(H.LAUNCH_ACTIVITY, r);
}
//ActivityThread.H.java
public void handleMessage(Message msg) {
if (DEBUG_MESSAGES) Slog.v(TAG, ">>> handling: " + codeToString(msg.what));
switch (msg.what) {
case LAUNCH_ACTIVITY: {
Trace.traceBegin(Trace.TRACE_TAG_ACTIVITY_MANAGER, "activityStart");
final ActivityClientRecord r = (ActivityClientRecord) msg.obj;
r.packageInfo = getPackageInfoNoCheck(
r.activityInfo.applicationInfo, r.compatInfo);
handleLaunchActivity(r, null, "LAUNCH_ACTIVITY");
Trace.traceEnd(Trace.TRACE_TAG_ACTIVITY_MANAGER);
} break;
....
}
}
//ActivityThread.java
private void handleLaunchActivity(ActivityClientRecord r, Intent customIntent, String reason) {
......
Activity a = performLaunchActivity(r, customIntent);
if (a != null) {
handleResumeActivity(r.token, false, r.isForward,
!r.activity.mFinished && !r.startsNotResumed, r.lastProcessedSeq, reason);
.....
}
.....
}
private Activity performLaunchActivity(ActivityClientRecord r, Intent customIntent) {
.....
ContextImpl appContext = createBaseContextForActivity(r);
Activity activity = null;
try {
java.lang.ClassLoader cl = appContext.getClassLoader();
//创建activity
activity = mInstrumentation.newActivity(cl, component.getClassName(), r.intent);
StrictMode.incrementExpectedActivityCount(activity.getClass());
r.intent.setExtrasClassLoader(cl);
r.intent.prepareToEnterProcess();
if (r.state != null) {
r.state.setClassLoader(cl);
}
} catch (Exception e) {
if (!mInstrumentation.onException(activity, e)) {
throw new RuntimeException(
"Unable to instantiate activity " + component
+ ": " + e.toString(), e);
}
}
.....
Application app = r.packageInfo.makeApplication(false, mInstrumentation);
.....
if (r.isPersistable()) {
//生命周期的调用
mInstrumentation.callActivityOnCreate(activity, r.state, r.persistentState);
} else {
mInstrumentation.callActivityOnCreate(activity, r.state);
}
.....
}
//LoadedApk.java
public Application makeApplication(boolean forceDefaultAppClass,Instrumentation instrumentation){
if (mApplication != null) {
return mApplication;
}
try {
java.lang.ClassLoader cl = getClassLoader();
if (!mPackageName.equals("android")) {
Trace.traceBegin(Trace.TRACE_TAG_ACTIVITY_MANAGER,"initializeJavaContextClassLoader");
initializeJavaContextClassLoader();
Trace.traceEnd(Trace.TRACE_TAG_ACTIVITY_MANAGER);
}
ContextImpl appContext = ContextImpl.createAppContext(mActivityThread, this);
//创建application
app = mActivityThread.mInstrumentation.newApplication(cl, appClass, appContext);
appContext.setOuterContext(app);
} catch (Exception e) {
if (!mActivityThread.mInstrumentation.onException(app, e)) {
Trace.traceEnd(Trace.TRACE_TAG_ACTIVITY_MANAGER);
throw new RuntimeException(
"Unable to instantiate application " + appClass
+ ": " + e.toString(), e);
}
}
}

这里activity启动之后将消息传递给activitythread中的handler处理,然后重点在消息处理后调用的performLaunchActivity中,主要干了两件事,一是通过反射创建activity,二是创建application,当然如果application已存在,就不用再创建了。后面就开始了Activity生命周期的调用。
在performLaunchActivity方法中可以看到,调用生命周期oncreate方法的具体实现是在mInstrumentation中,其实其他像activity和Application的生命周期的调用包括创建等等也是在这个类中实现,所以就印证了我上面提到的Instrumentation充当着一个管家的作用。

到这里,,就差不多可以点投降了。
这里简单的总结了下启动过程中的ipc,当然这里面不仅仅只有这两次跨进程通信,而且服务端参与的服务也不仅仅只有AMS,像在resolveIntent时就会跨进程去调用PMS中的服务。
此处输入图片的描述

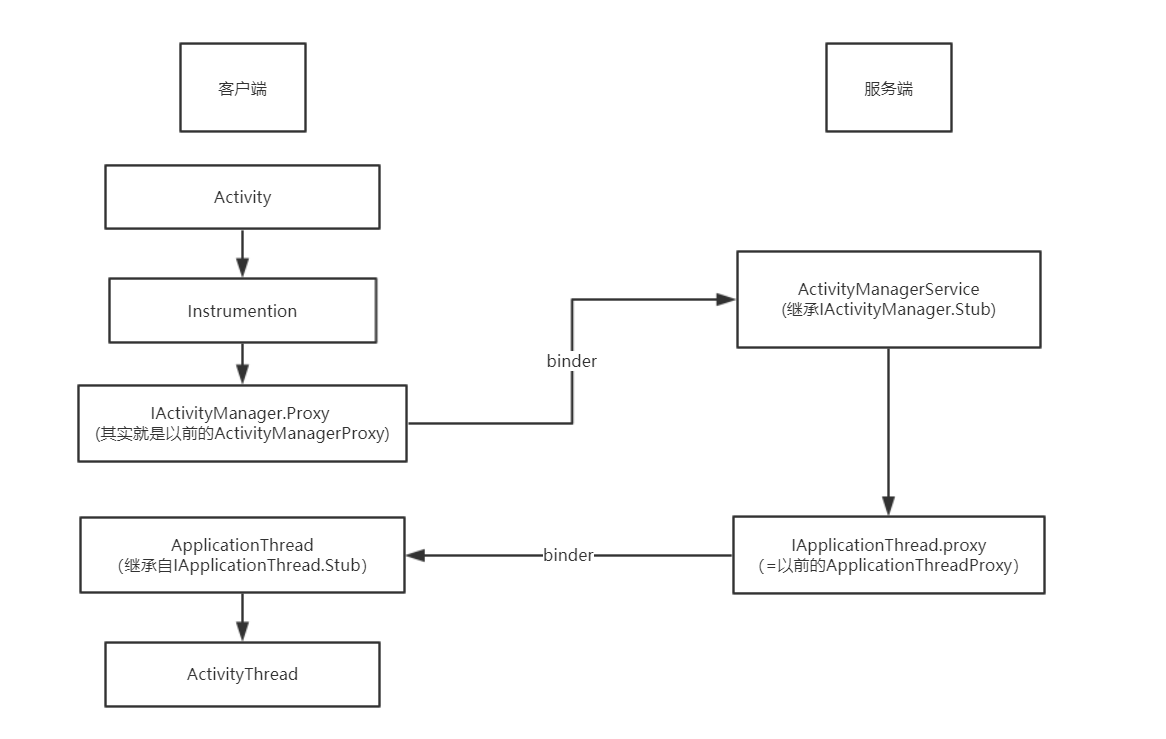
那么Activity启动的流程….大致…..是这样,猝。

一点儿干货

点此可以详细查看activity启动流程
个人觉得讲binder讲的最好的一篇